Restorative yoga is an incredible way to help the mind and body relax and heal. Unlike more active yoga styles, restorative yoga allows us to sink into our body’s natural rhythm, promoting deep relaxation, balance, and a sense of wellbeing.
This guide will provide you with an essential restorative yoga sequence, including a downloadable PDF file for your convenience.
Content Outline
Benefits
- Reduces stress and anxiety
- Improves sleep quality
- Enhances flexibility
- Promotes body’s natural healing process
The Sequence
- Child’s Pose (Balasana): Start in a kneeling position, sit on your heels, then bend forward and stretch your arms in front of you. Rest your forehead on the mat. Hold for 5 minutes.
- Legs-Up-The-Wall Pose (Viparita Karani): Lie on your back and rest your legs up against a wall. Your body should form a 90-degree angle. Relax and breathe deeply. Hold for 5-10 minutes.
- Reclining Bound Angle Pose (Supta Baddha Konasana): Lie on your back, bend your knees, and bring your feet together. Let your knees fall out to the sides. Rest your arms comfortably by your sides. Hold for 5 minutes.
- Corpse Pose (Savasana): Lie flat on your back, legs slightly apart and arms resting by your side, palms facing upwards. Close your eyes and take deep breaths. Hold for 5-10 minutes.
Restorative Yoga Sequence [PDF Included]
This sequence is designed to guide you through several restorative yoga poses intended to bring relaxation to your body and mind. This sequence can be practiced at any time, but it’s particularly beneficial at the end of a challenging day to aid in stress relief and promote good sleep.
- Balasana (Child’s Pose): This pose helps to stretch the hips, thighs, and ankles while reducing stress and fatigue.
- Viparita Karani (Legs-Up-The-Wall Pose): This pose helps to relieve tired leg muscles and gives you all the benefits of inversion, without the effort.
- Supta Baddha Konasana (Reclining Bound Angle Pose): This pose helps to open up the hips and chest, promoting relaxation and deep breathing.
- Savasana (Corpse Pose): This pose brings deep, meditative relaxation and improves mental wellbeing.
Please ensure that each pose is held for at least 5 minutes, allowing your body to sink into each pose and your mind to focus on your breath.
To help you on your restorative yoga journey, we have created a downloadable PDF that includes the detailed steps, modifications, and benefits for each pose in this sequence.
Download Restorative Yoga Sequence pdf
Download the Restorative Yoga Sequence PDF Here
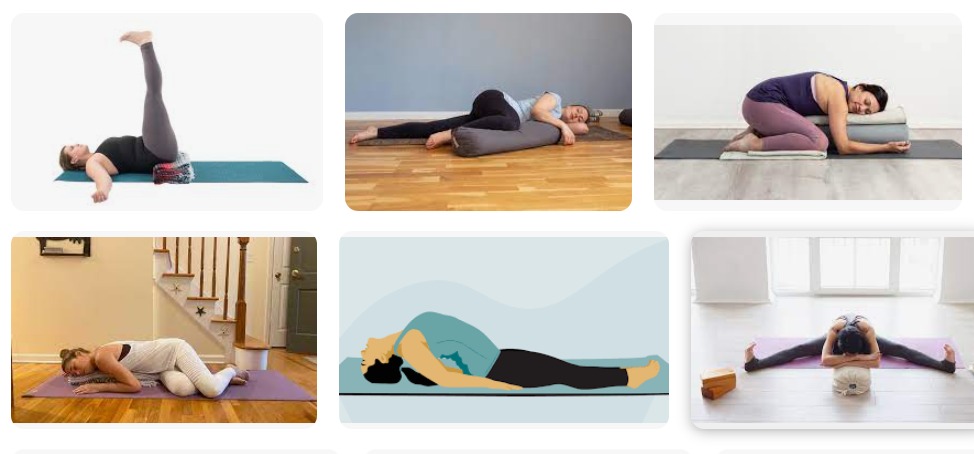
Top 10 Restorative Yoga Poses
Gentle stretching of the connective tissue through a restorative yoga sequence can be a delightful way to relieve tension and loosen the hips and pelvic area, making challenging poses more achievable.
For Restorative Yoga instructors, this sequence is an excellent way to introduce students to the practice. Want to discover the best restorative yoga poses for you? Check out our top picks to start your journey:
1. Child’s Pose (Bālāsana)
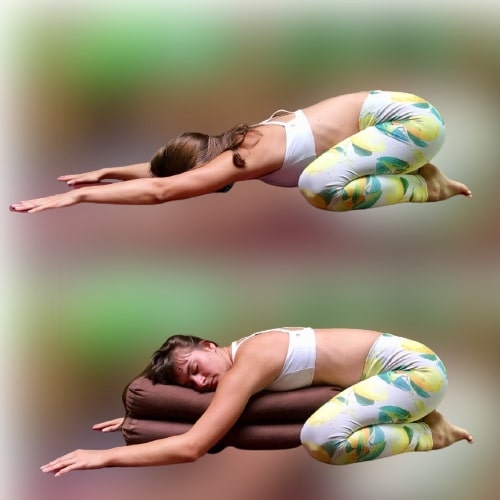
The Child’s Pose is a fundamental and frequently performed posture in yoga. To execute this pose, begin by positioning yourself sitting on your heels while your knees are spread wide. Next, bend your body forward until your forehead touches the mat and your abdomen fits comfortably between your thighs. Stretch your arms forward or let them lie relaxed by your sides.
The Child’s Pose can be adapted in numerous ways, but my preferred variation includes setting a bolster between your legs and gently lowering onto it, which replicates a soothing, womb-like feeling.
Pro tip: To make the Child’s Pose even more comfortable, fold your yoga mat in half or place a folded blanket under your knees and feet.
2. Seated Cat Cow (Upavistha Bitilasana Marjaryasana)
")
The Cat and Cow pose is a fundamental posture frequently featured in yoga classes. This gentle motion helps to mobilize the spinal vertebrae in various directions, greatly benefiting spinal health. The seated rendition of this pose can foster a sense of spaciousness within the body, leaving you feeling rejuvenated.
To execute the seated Cat and Cow pose, begin by sitting in a cross-legged position with your hands resting on your knees. Maintain an upright posture, firmly grounded on your sitting bones. While inhaling, slightly arch your back, lean your chest forward, and look upward for a mild backbend. As you exhale, round your back, stretch your arms to grip your knees, and direct your gaze toward your navel. Repeat this movement several times, synchronizing your breath with the motion.
If a cross-legged position is uncomfortable for you, consider sitting with your knees bent and your feet placed six to eight inches away from your pelvis, keeping them hip-width apart. Regardless of your sitting position, the movement remains the same – inhale to arch your back, exhale to round it.
Supported Bridge Pose (Setu Bandha Sarvangasana)
")
To perform this restorative yoga pose, lie down on your back with your knees bent and your feet positioned near your hips. Position a yoga block under your sacrum at the lowest level, ensuring its broadest surface is in contact with the floor. You can either rest your hands on your stomach or stretch your arms out like a cactus. Inhale and exhale deeply, maintaining this position for 3-5 minutes.
If you feel comfortable, consider a variation by elevating the block to a higher level, supporting your sacrum with its long, thin edge. Retain this posture for another 3-5 minutes while taking profound breaths.
To intensify the relaxation, you may spread your feet apart and allow your knees to gently drop inward toward each other. This adjustment can be beneficial if you struggle to fully relax your legs when your knees are pointing upward. This restorative yoga pose aids in releasing tension and fostering relaxation, making it a valuable part of any yoga routine.
4. Reclining Bound Angle Pose (Supta Baddha Konasana)
")
To execute this pose, begin by lying on your back, drawing your feet towards your pelvis and bending your knees. Open your knees outward and press the soles of your feet together. You can place bolsters under each knee to reduce tension in your inner thighs. You have the option of spreading your arms to the sides or resting your hands on your belly. Take calm, consistent breaths and maintain this position for at least five minutes.
For an intensified stretch, consider looping a strap around your waist and feet. This modification can be beneficial if you’re looking to push yourself further in your practice and augment the stretch.
5. Thread the Needle Pose (Parsva Balasana)
")
To execute the Thread the Needle Pose, also known as Parsva Balasana, begin on all fours ensuring your wrists, elbows, and shoulders align, and your knees are positioned directly beneath your hips. Maintain a straight back and activate your core muscles. For added comfort, you can place a folded mat under your knees.
Inhale and elevate your right arm towards the sky, slightly twisting your torso. On the exhale, bend your right elbow and thread your arm beneath your left arm until your right shoulder and temple touch the mat. Spend a few moments in this position taking deep breaths before repeating the movement with your opposite side.
For an intensified shoulder stretch, raise your left arm and extend it towards your back until it reaches your right inner thigh. Alternatively, if that’s too challenging, you can simply leave your arm behind you.
6. Supported Forward Fold (Paschimottanasana)
")
To begin this pose, assume the staff pose by sitting on the edge of a bolster with a straight back and extending your legs out in front of you. Slightly bend your knees and place a bolster or rolled blanket underneath them. Place another bolster on your thighs and gently fold your upper body onto the bolsters. Hinge at your hips, ensuring your spine remains straight until your tummy is touching the bolster. Stay in this position for 5-10 minutes, taking deep breaths into your diaphragm.
If it feels more comfortable for you, you can use two or three bolsters on your thighs to fold onto. This modification can help you achieve a deeper stretch and relaxation in this pose.
7. Sleeping Pigeon Pose (Eka Pada Rajakapotasana)
")
To practice the sleeping pigeon pose, start on all fours. Lift your right leg and bring your shin to the front of the mat with your knee slightly to the right and your foot close to your pelvis. Straighten your back leg directly behind you. To help even out your hips, place a block under your right sitting bone. Then, place one or two bolsters on the inside of your right leg and gently fold forward onto them. Maintain equal-length inhales and exhales and hold the pose for at least 5 minutes before repeating on the other side.
See also Iyengar Yoga: A Comprehensive Guide to a Mindful Practice
For added comfort, you can place a folded blanket under the foot close to your pelvis if you experience any discomfort.
8. Supine Spinal Twist (Jathara Parivartanasana)
")
Lie down on your back and bring your right knee up towards your chest. Use your left hand to pull the right knee towards the left side of your body for a gentle twist. Place a bolster or two under the right knee for support. Keep both shoulders on the ground, extend your arms out to the sides, and take deep breaths. Repeat on the other side, holding the pose for the same amount of time.
Tip: To deepen the stretch, turn your gaze in the opposite direction of your bent knee.
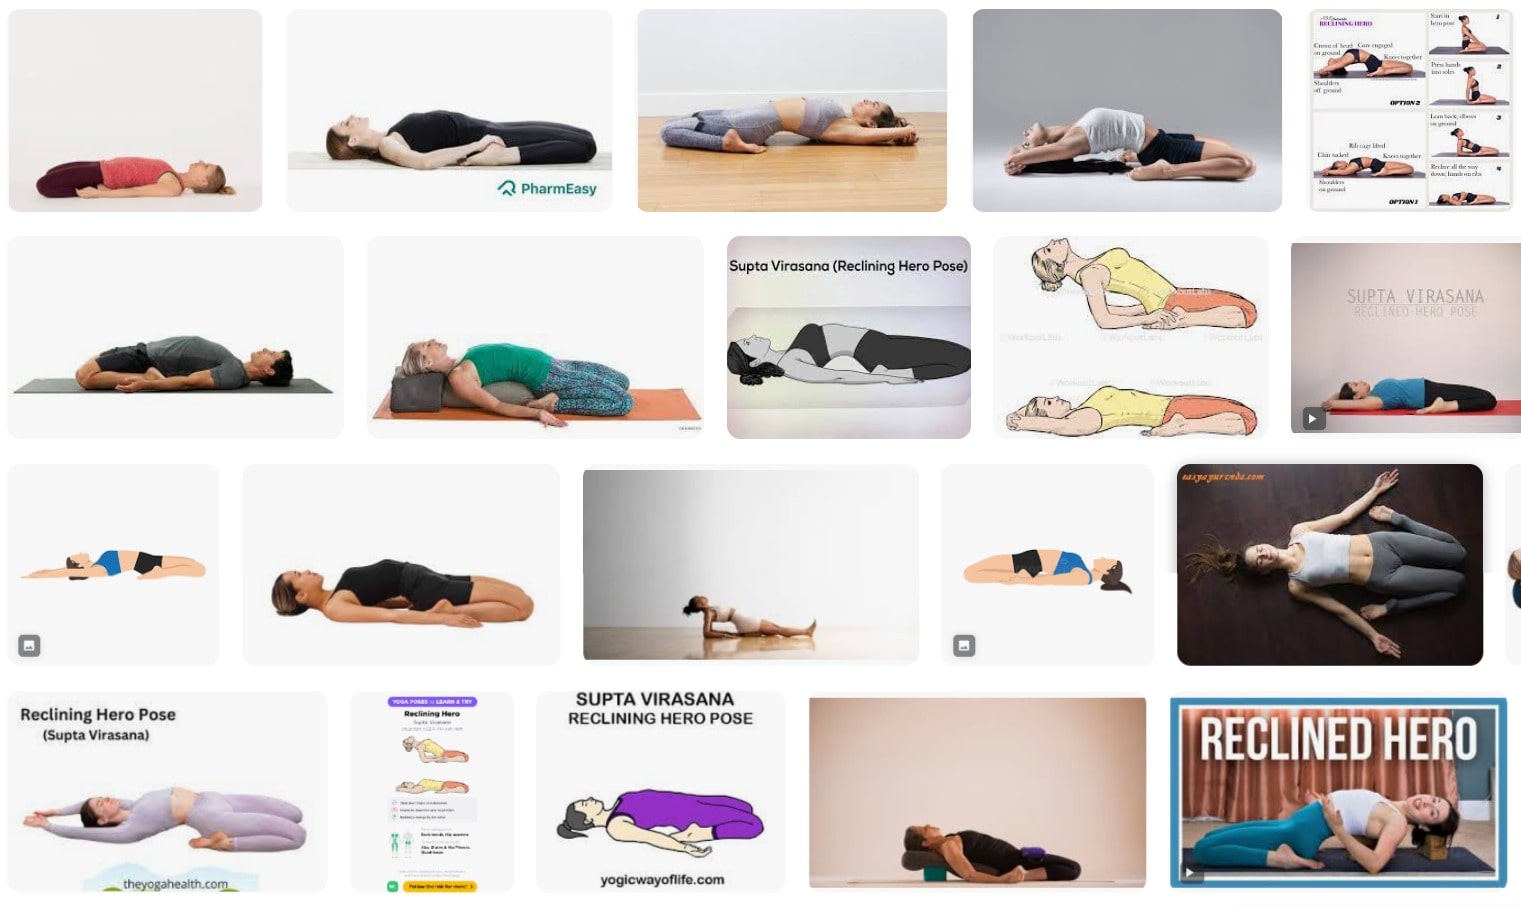
9. Supported Fish Pose (Matsyasana)
")
To enhance your relaxation practice, take a bolster or a long pillow and place it horizontally behind your lower back, ensuring that the short edge is touching your lower back. Then, gently lay down on the bolster with your legs stretched out in front and your arms resting by your sides with palms facing upwards. Stay in this pose for as long as you desire while taking deep breaths to calm your mind and body.
Tip: You can use this pose instead of Shavasana at the end of your yoga practice for a unique and refreshing experience.
10. Legs Up The Wall (Viparita Karani)
")
To practice the ultimate restorative posture, start by sitting as close as possible to a wall. Then, lie down on your back and lift your legs up against the wall. Scoot your hips away from the wall until your legs are comfortably straight up the wall. Release all tension in your legs and body, and focus on taking deep breaths. Stay in this pose for 5-10 minutes.
Tip: You can experiment with different leg variations, such as tree pose legs, bound angle legs, or straddle splits, to find the most comfortable position for you.
Conclusion
Restorative yoga is not about the perfect pose; it’s about tuning into your body and giving it what it needs. We hope this guide, along with the PDF, will assist you in exploring the world of restorative yoga and all the benefits it has to offer. Remember, it’s your practice, so feel free to adjust anything that doesn’t serve you. Enjoy the journey to relaxation and rejuvenation!


It was great seeing how much work you put into it. The picture is nice, and your writing style is stylish, but you seem to be worrying that you should be presenting the next article. I’ll almost certainly be back to read more of your work if you take care of this hike.
I’ve been a regular on this amazing website lately, they have phenomenal content for users. The site owner clearly cares about engaging visitors. I’m a huge fan and hope they keep up their excellent work!
Wow, amazing blog structure! How long have you been blogging for?
you make blogging look easy. The total look of your site is wonderful, let alone the content material!
You can see similar here sklep internetowy
Hi there! Do you know if they make any plugins to assist with Search Engine Optimization?
I’m trying to get my blog to rank for some targeted keywords but I’m not seeing
very good success. If you know of any please share. Many thanks!
You can read similar text here: Dobry sklep
Howdy! Do you know if they make any plugins to assist with Search Engine Optimization? I’m trying to get my blog to rank for some targeted keywords but I’m not seeing very
good results. If you know of any please
share. Kudos! You can read similar article here: E-commerce
Hey there! Do you know if they make any plugins to
help with SEO? I’m trying to get my blog to rank for some targeted keywords
but I’m not seeing very good results. If you know of any please share.
Thank you! You can read similar blog here: Najlepszy sklep
Howdy! Do you know if they make any plugins to assist with SEO?
I’m trying to get my blog to rank for some targeted keywords but I’m
not seeing very good gains. If you know of any please share.
Thanks! You can read similar article here: Dobry sklep
Just wish to say your article is as surprising The clearness in your post is just cool and i could assume youre an expert on this subject Fine with your permission allow me to grab your RSS feed to keep updated with forthcoming post Thanks a million and please keep up the enjoyable work
Hi! Do you know if they make any plugins to assist with Search
Engine Optimization? I’m trying to get my website to rank for some targeted keywords but I’m not seeing very good gains.
If you know of any please share. Thanks! You can read similar blog here:
Auto Approve List
I have read so many articles or reviews concerning the blogger
lovers but this piece of writing is truly a fastidious paragraph, keep it up.
my site: vpn special
Great post. I’m going through many of these issues as
well..
Visit my web-site :: vpn 2024
Wow, superb blog format! How lengthy have
you ever been blogging for? you made running a blog glance
easy. The total look of your website is great, as neatly
as the content! You can see similar here sklep online
I feel that is among the so much vital info for me. And i’m satisfied reading your article.
However want to statement on few common issues, The website style
is wonderful, the articles is in point of fact great : D.
Just right process, cheers
Amazing blog! Is your theme custom made or did you download it from
somewhere? A theme like yours with a few simple adjustements would really make my blog shine.
Please let me know where you got your design. Bless you
Excellent website you have here but I was curious if you
knew of any forums that cover the same topics discussed here?
I’d really love to be a part of community where I can get feed-back from other
knowledgeable individuals that share the same interest.
If you have any recommendations, please let me know.
Cheers!
I pay a visit everyday some sites and blogs to read content, except this webpage offers
quality based articles.
Whats up very nice website!! Guy .. Excellent ..
Superb .. I will bookmark your website and take the feeds also?
I’m happy to seek out a lot of helpful information here in the publish,
we want work out extra strategies in this regard,
thanks for sharing. . . . . .
I’m not that much of a internet reader to be
honest but your sites really nice, keep it up!
I’ll go ahead and bookmark your website to come back down the road.
Cheers
I’m really impressed with your writing skills as well as with the layout on your weblog.
Is this a paid theme or did you modify it yourself?
Either way keep up the nice quality writing, it is rare to see a nice blog like this one
nowadays.
Informative article, totally what I was looking for.
Finding your blog was a delight. It’s filled with knowledgeable content
and engaging commentary, which isn’t easy to come by these days.
appreciate the effort you’ve put into your work.
Your article is refreshingly unique. You offer a novel viewpoint that is stimulated my interest.
Can’t wait to seeing what you post next.
I just had to leave a comment. Your content shine with me on a profound level.
If you’re planning on offering a newsletter, sign me up!
It would be a pleasure to have your insights sent right to
my inbox.
Your writing resonated with me. It’s not every day you come across a piece that invites
you to think deeply. Keen to read more of your thoughts and encourage you to
carry on with your passion.
Your article was an eye-opener. With a sea of
content online, it’s wonderful to read content that’s as engaging and educational as yours.
Keep it up
This syntax provides a variety of options for creating a
positive and encouraging blog comment that compliments the author’s work
and expresses a desire to continue engaging
with their content.
Occasionally, I stumble upon a blog that
grabs my interest because of its thought-provoking articles.
Yours is undoubtedly one of those rare gems.
The way you interlace your words is not just informative but also remarkably entertaining.
I commend the dedication you show towards your craft
and eagerly await your future posts.
In the plethora of the digital world, it feels rewarding to find
a blogger who puts considerable effort into their work.
Your posts don’t just offer knowledgeable takeaways but also stimulate engaging discussions.
Count me in as a regular reader from this point forward.
Your blog has become a go-to resource for me, and I find myself
peruse it regularly for new content. Each post is like a tutorial in the topic at hand, delivered
with clarity and wit. Might you offering a subscription service or a periodic newsletter?
I am keen to get more of your knowledge straight to my inbox
The unique angle you bring to subjects is both refreshing and rare,
it’s immensely appreciated in the modern online landscape.
Your ability to break down complex concepts and present
them in an easily digestible way is an ability that should not
go unnoticed. I look forward to your upcoming posts and the dialogues they’ll ignite.
Finding a blog that acts as both a cognitive challenge and a warm
discussion. Your posts do just that, offering a rich blend
of intellectual stimulation and personal connection. The audience you’re building here is proof
to your impact and authority. I’m anxious to see where you’ll
take us next and I’m all in for the ride.
Upon spending several hours diving into the depths of the internet today,
I have to declare that your blog is like a lighthouse in a sea of information. Never before have I come across such an amalgamation of intriguing
content that resonate on a substantial level. Your penchant for elucidating complex subjects with simplicity
and acuity is commendable. I’m eagerly waiting for
your next article, anticipating it will enhance my
understanding even further.
In the current digital era, where content is plentiful, your blog stands out as a bastion of authenticity.
It’s a rarity to find a space of the web that commits to fostering knowledge expansion. Your eloquently written posts ignite a yearning for understanding
that many of us long for. I would be honored if there’s a possibility to sign up for direct notifications, as I would hate to miss a single thought-provoking post.
Your online presence is the epitome of what engaged
storytelling can achieve. Each entry you compose
is brimming with actionable takeaways and rich narratives that make me reflect long after I’ve read them.
Your narrative is an invaluable contribution to the often noisy internet space.
If you have an exclusive subscription, count me as an eager participant to join. Your writing is worth supporting.
I am coming back to your blog time and again, drawn by the standard of discussion you initiate.
It’s obvious that your blog is more than a place for
sharing thoughts; it’s a hub for curious minds who are in search of purposeful
engagement. Your dedication toOf course!
As soon as I began reading your blog, I knew it was something extraordinary.
Your ability to plunge into complex topics and clarify them for your readers
is truly impressive. Each post you release is a treasure trove of insights, and I always find myself anxious
to read what you’ll explore next. Your commitment to excellence
is clear, and I anticipate that you’ll keep on offering such precious insights.
Your writing serves as a lighthouse in the sometimes turbulent seas of online content.
Your comprehensive explorations into varied subjects are not only educational but also immensely engaging.
I respect the way you combine meticulous investigation with narrative storytelling, creating posts
that are equally enlightening and enjoyable. If there’s a method to sign up for updates your blog or become part of a mailing list,
I would be grateful to be informed of your latest musings.
As a fellow writer, I’m inspired by the zeal you put into each article.
You have a talent for making even the most complex
topics comprehensible and intriguing. The way you break
down concepts and link them to wider narratives is nothing short of masterful.
Please tell me if you have any workshops or digital resources in the works, as I would love to gain further insight from your expertise.
It’s not often to find a blog that strikes the perfect chord with both heart
and mind. Your articles are crafted with a degree of thoughtfulness that addresses the core
of the human condition. Whenever I read your blog,
I come away feeling enriched and motivated.
I’m keen to know whether you intend to
From the moment I commenced exploring your blog, I could tell it was something special.
Your skill to plunge into complex topics and unravel them for your readership is truly impressive.
Each entry you publish is a wealth of knowledge, and I
constantly find myself anxious to discover what you’ll delve into next.
Your dedication to high-quality content is evident, and I trust that you’ll continue offering such valuable insights.
Finding your website was a delight. Brimming with informative content and engaging commentary, which is hard
to find these days. cherish the energy you’ve put into your writing.
Your post is captivating. You bring a novel viewpoint that has ignited my interest.
Looking forward to seeing what you write next.
I just couldn’t resist to leave a comment. Your content shine with me on a deeper level.
If you’re thinking about offering a newsletter, sign me
up! It would be a joy to have your insights delivered right to my inbox.
Your article struck a chord with me. It’s not every day you come across a
blog that encourages you to think deeply. I’m excited to see more of your
ideas and urge you to continue sharing.
Your blog post was an eye-opener. With an overwhelming amount of information online,
it’s great to encounter content that’s as engaging and educational as yours.
Please keep writing
This syntax provides a variety of options for creating a positive and encouraging blog comment that
compliments the author’s work and expresses a desire to continue engaging
with their content.
Every once in a while, I come across a blog that grabs my
interest because of its thought-provoking articles. Yours is without a doubt one
of those rare gems. The way you weave your words is not just informative
but also remarkably entertaining. I applaud the dedication you show towards your craft and eagerly look forward to your future posts.
In the plethora of the online space, it’s a pleasure to encounter a blogger who puts
so much heart into their work. Your posts not only provide knowledgeable takeaways but also spur thoughtful conversations.
You’ve gained a faithful follower from this point forward.
Your blog has quickly risen to the top of my list for
me, and I can’t help but peruse it regularly for updates.
Each post is like a tutorial in your niche, presented with eloquence and charm.
Might you creating a subscription service or a periodic newsletter?
I would be thrilled to get more of your knowledge directly to my inbox
The unique angle you bring to subjects is truly refreshing, it’s deeply needed in our
current digital landscape. Your ability to analyze complex concepts and offer them in a user-friendly way is a talent that should be celebrated.
I am excited for your upcoming posts and the conversations they’ll foster.
Finding a blog that provides both a brain gym and a soulful dialogue.
Your posts accomplish that, providing a harmonious
blend of knowledge and personal connection. The audience you’re nurturing here is testament to your impact and proficiency.
I’m eager to see where you’ll take us next and I’ll be following along closely.
Upon spending countless hours exploring the myriad
corridors of the internet today, I must say that your blog is like a beacon of knowledge.
Not once have I come across such a collection of
captivating content that resonate on a profound level.
Your knack for elucidating complex subjects with
elegance and sharpness is worthy of admiration. I’m patiently waiting for your next piece,
knowing it will enrich my understanding even further.
In the current age of information, where content is plentiful,
your blog shines as a bastion of genuine content creation. It’s a rarity to discover a platform of the web that commits to
cultivating knowledge expansion. Your articulate posts
stimulate an appetite for knowledge that many of us seek.
Kindly inform me if there’s a possibility to sign up for direct notifications,
as I do not wish to miss even one insightful post.
Your online presence is the epitome of what engaged storytelling can achieve.
Each entry you compose is laden with actionable takeaways and meaningful stories that leave me pondering
long after I’ve left the page. Your perspective is an invaluable contribution to the sometimes chaotic digital landscape.
If you have an exclusive subscription, count me as a committed member to join. Your content is
meriting sustaining.
I am coming back to your blog time and again, drawn by the caliber of conversation you foster.
It’s evident that your blog is not merely a platform for sharing thoughts; it’s a hub for curious
minds who seek substantive engagement. Your investment
inOf course!
From the moment I began reading your blog, I knew it was something unique.
Your ability to dive into complex topics and clarify them for your readers is truly remarkable.
Each entry you release is a wealth of information, and I always find myself anxious to
see what you’ll delve into next. Your commitment to quality is evident, and I anticipate that you’ll continue offering such precious insights.
Your writing serves as a guiding light in the sometimes turbulent waters of online content.
Your in-depth analysis into varied subjects are
not only informative but also immensely absorbing. I respect the way you meld thorough research with relatable examples, producing posts that are
both enlightening and enjoyable. If there’s a way
to subscribe your blog or become part of a mailing
list, I would be thrilled to be kept in the loop of your latest
musings.
As a content creator, I’m motivated by the passion you put into
each blog entry. You have a talent for making even the most obscure topics accessible and
fascinating. The way you present ideas and relate them to larger contexts is incredibly masterful.
Please let me know if you have any workshops or digital resources in the works, as I would jump at the chance to gain further insight from
your expertise.
It’s not often to encounter a blog that strikes the perfect chord with both the intellectual and the personal.
Your articles are written with a depth of understanding that touches the core
of the human experience. Whenever I visit your blog, I leave
feeling enriched and stimulated. I’m eager to know whether you have plans to
From the moment I commenced reading your blog, I could tell it was something extraordinary.
Your skill to delve into complex topics and unravel them for
your audience is truly impressive. Each post
you release is a wealth of knowledge, and I always find myself excited to
discover what you’ll explore next. Your dedication to excellence is apparent,
and I trust that you’ll continue sharing such invaluable insights.
slot ak4d adalah situs judi online paling baik di Indonesia.
Informative Site… Hello guys here are some links that contains information that you may find useful yourselves. It’s Worth Checking out 급전
“Situs penghasil uang terbaik adalah solusi terbaik buat yang pengen nambah penghasilan! Gak perlu ribet, tinggal daftar aja!”
Your blog is a valuable resource for anyone seeking information, thank you!급전
I resonate deeply with what you’ve written.대출
Your article is thought-provoking and insightful.급전
None of this is anything you require to worry about when you’re working with white hat devices.
My webpage: https://www.yjpaper.co.kr/bbs/board.php?bo_table=free&wr_id=1652265
Your insights have challenged my thinking in the best possible way.급전
Your article is a valuable resource for anyone interested in this topic.급전
Your writing always leaves me wanting more.대출
Appreciating the commitment you put into your site and detailed information you present.
It’s nice to come across a blog every once
in a while that isn’t the same old rehashed information. Fantastic
read! I’ve saved your site and I’m adding your RSS feeds to my Google account.